Tutorial Overview
ClashX is one of the most popular proxy tools on macOS, with over 30,000 GitHub stars and 500,000+ active users. This tutorial will guide you step-by-step through downloading, installing, and configuring ClashX on Mac, with the entire process taking only 3 minutes.
Whether you're using an Intel-based MacBook or the latest Mac with M1/M2/M3 chips, this tutorial applies to you. We'll provide detailed screenshots and solutions to common problems to ensure even beginners can get started easily.
If you're already familiar with ClashX basics, you can jump directly to the Download Methods or Installation Steps sections. If you encounter any issues, check the Common Issues section.
Why Choose ClashX?
- Completely Free: Open-source software with no fees required
- Powerful Features: Supports multiple proxy protocols with flexible rule engine
- Excellent Performance: Low memory usage with stable and smooth operation
- Native Support: Perfectly adapted for Apple Silicon chips
- Active Community: Complete Chinese documentation with timely problem solving
Pre-download Preparation
Before starting to download ClashX, please ensure your Mac meets the following system requirements. This will ensure the subsequent installation and usage process goes smoothly.
System Requirements
Chip Compatibility
ClashX provides two versions. Please choose the correct version based on your Mac's chip type:
| Chip Type | Compatible Models | Download Version |
|---|---|---|
| Intel chip | Pre-2020 MacBook/iMac/Mac mini | ClashX (Intel) |
| Apple Silicon (M1/M2/M3) |
Post-2020 MacBook Air/Pro, iMac, Mac mini, Mac Studio | ClashX (Apple Silicon) |
Click the Apple icon in the top-left corner → Select "About This Mac" → Check the "Chip" or "Processor" field. If it shows "Apple M1/M2/M3", it's Apple Silicon; if it shows "Intel Core", it's an Intel chip.
Preparation Checklist
- ✅ Confirm macOS version is 10.15 or higher
- ✅ Confirm you have administrator privileges (password required for installation)
- ✅ Prepare proxy configuration file or subscription link
- ✅ Close other potentially conflicting proxy software
- ✅ Ensure network connection is normal
3 Download Methods
ClashX provides multiple download channels. You can choose the most suitable download method based on your situation. Here are detailed instructions for three mainstream download methods.
Method 1: Official Website Download (Recommended)
Downloading through the ClashX official website is the safest and most convenient method. The official website provides verified latest versions with detailed release notes.
Download Steps:
- Visit ClashX official website: https://clashx.tech
- Click the "Download" button or navigate to the download page
- Select the version suitable for your Mac chip (Intel or Apple Silicon)
- Click the download button and wait for download to complete
- Downloaded file is in .dmg format, approximately 10-15MB in size
Official website download is fast, versions are updated promptly, and files are safe and reliable. Suitable for most users, especially users in China. The official website also provides detailed version changelogs and usage documentation.
Method 2: GitHub Download
GitHub is ClashX's open-source hosting platform. You can download the latest or historical versions directly from the GitHub Releases page. This method is suitable for users who need specific versions or want to verify the code.
Download Steps:
- Visit ClashX GitHub repository: https://github.com/yichengchen/clashX
- Click the "Releases" link on the right
- Find the Assets section in the latest release
- Download ClashX.dmg (Intel) or ClashX-arm64.dmg (Apple Silicon)
GitHub access speed may be slow in China. If download speed is too slow, you can: 1. Use GitHub mirror acceleration service (such as ghproxy.com) 2. Wait for off-peak hours to download 3. Switch to official website download method
Method 3: Mirror Site Download
Some domestic mirror sites provide ClashX download services, which can solve GitHub's slow download speed problem.
Common Mirror Sites:
- Domestic CDN acceleration: Some tech communities provide accelerated downloads
- Open-source mirror sites: Such as Tsinghua University, USTC mirror sources
- Cloud storage shares: User-uploaded versions (pay attention to security)
When using third-party mirror sites for downloads, be sure to verify file integrity and security. It's recommended to prioritize official website or GitHub official channels. Avoid downloading from unknown sources to prevent viruses or malicious software.
Version Selection Recommendations
Detailed Installation Steps (Illustrated Tutorial)
After download completes, follow these steps to install. The entire installation process is very simple, similar to installing other macOS applications.
Step 1: Open DMG File
- Find the downloaded ClashX.dmg file in Finder (usually in the "Downloads" folder)
- Double-click to open the DMG file
- Wait a moment, the system will mount the disk image and pop up the installation window
Intel chip file name is ClashX.dmg, Apple Silicon file name is ClashX-arm64.dmg. Please make sure you downloaded the version suitable for your chip type.
Step 2: Drag to Applications Folder
- After opening the DMG file, you'll see the ClashX application icon and an Applications folder shortcut
- Drag the ClashX icon to the Applications folder
- Wait for copy to complete (usually only takes a few seconds)
- After copying completes, you can eject the DMG disk image
Step 3: First Time Opening ClashX
- Open Launchpad or go to the Applications folder
- Find and click the ClashX icon
- If you see a "cannot open" prompt, refer to the Common Issues section below
🔐 Security Prompt May Appear — Visual Guide
When opening for the first time, macOS may show a "cannot open because unable to verify developer" prompt. This is a normal security mechanism for all unsigned macOS apps. Follow these visual steps:
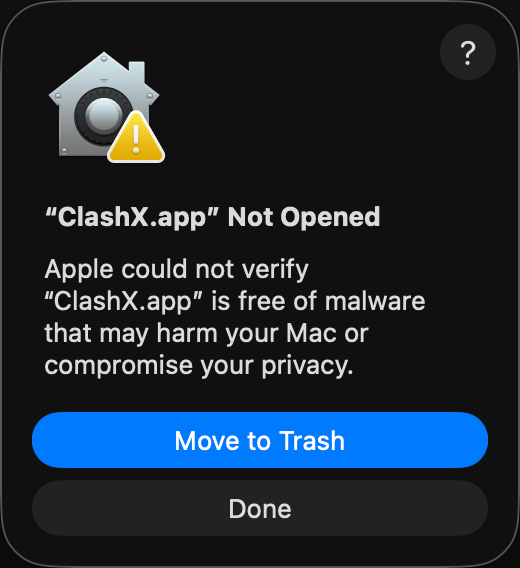
① First dialog: Click "Done"
This is the initial security alert. Click "Done" to proceed.
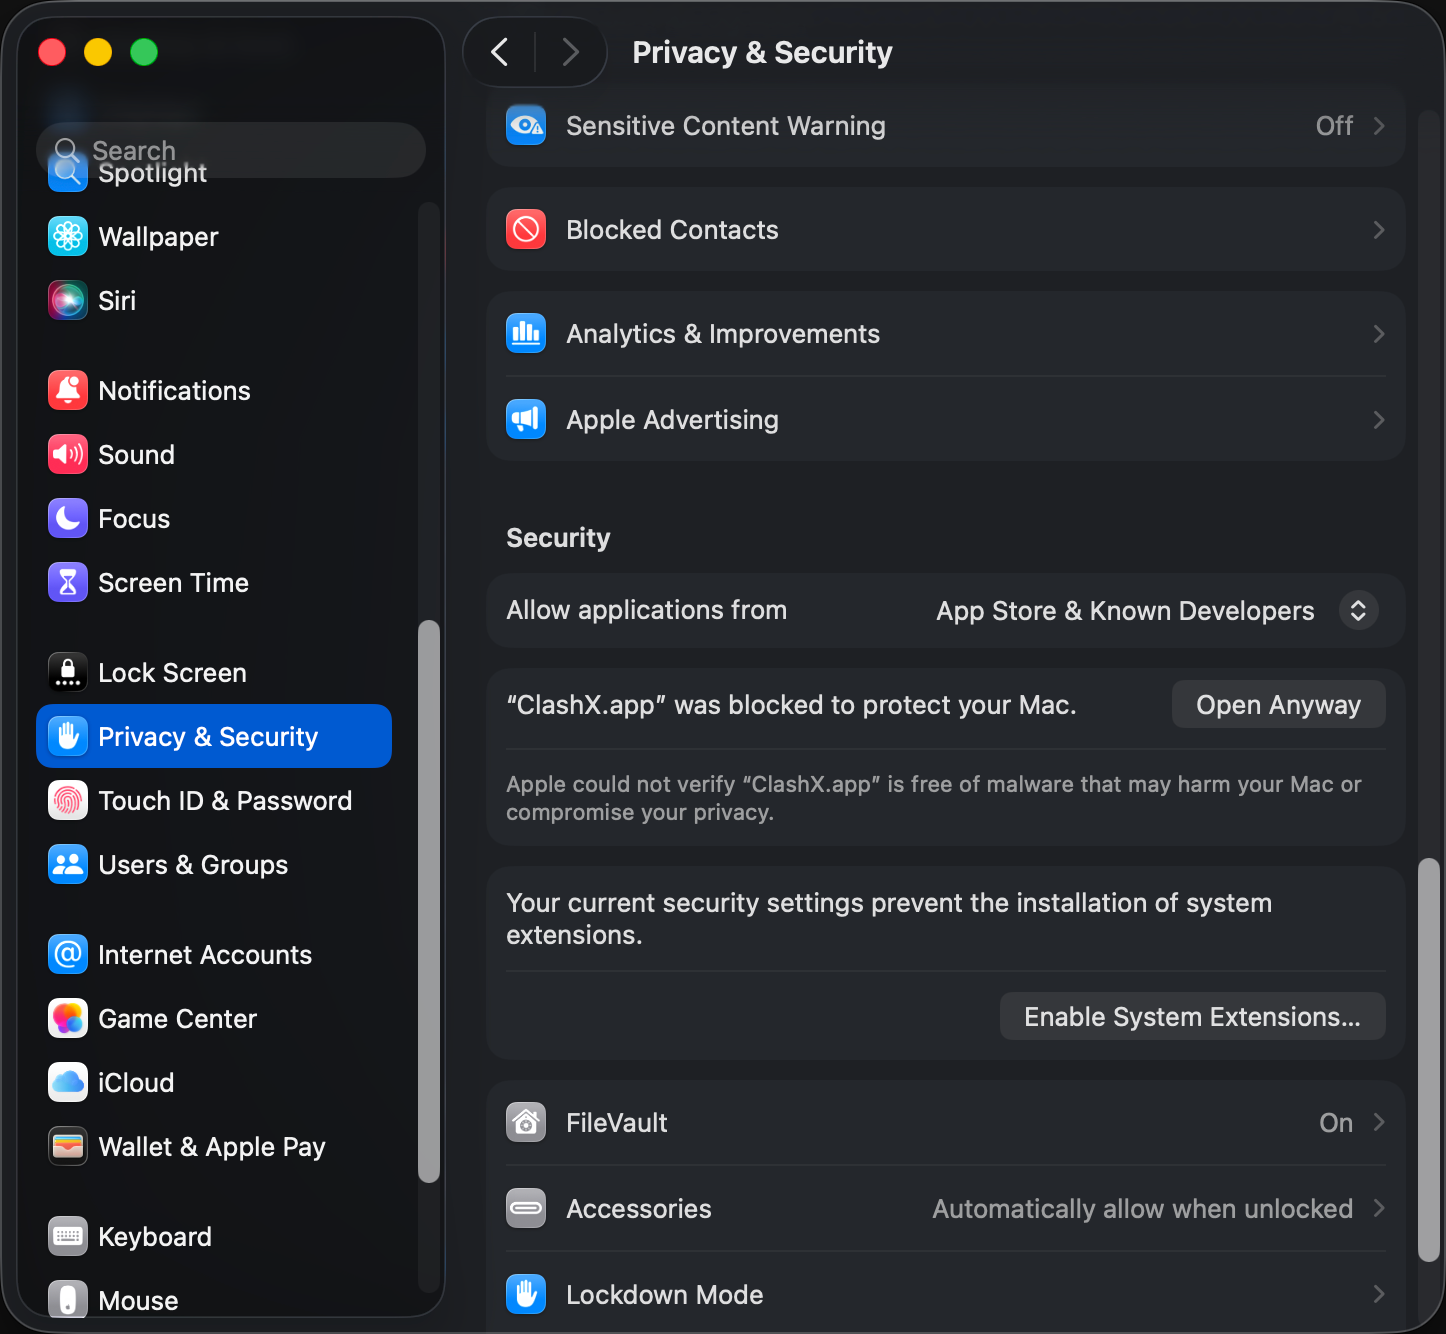
② System Settings → Click "Open Anyway"
Go to System Settings → Privacy & Security, find "ClashX was blocked", and click "Open Anyway".
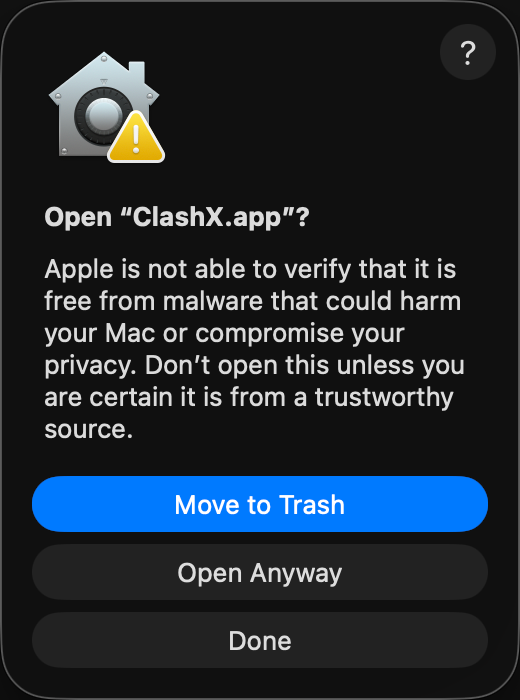
③ Final confirmation: Click "Open Anyway"
Final macOS confirmation. After this, ClashX will open without warnings.
Step 4: Verify Installation
If ClashX launches successfully, you'll see a cat icon in the menu bar (top-right corner of screen). This indicates ClashX has been successfully installed and is running.
- ✅ Menu bar displays cat icon
- ✅ Clicking the icon shows menu options
- ✅ ClashX is in the Applications folder
First Launch Configuration
After ClashX installation completes, some basic configuration is still needed for normal use. This section will guide you through the first launch configuration process.
Allow System Permissions
When launching ClashX for the first time, the system will request multiple permissions. These permissions are necessary for ClashX to work properly.
Required Permissions:
- Install Helper Tool: First launch will pop up a password input box, enter your Mac administrator password
- Network Access Permission: Allow ClashX to control network connections
- System Proxy Settings: Allow ClashX to modify system proxy configuration
ClashX needs to install a helper tool to manage system proxy settings. This helper tool needs elevated privileges to modify system-level network configuration, so it requires your administrator password. This is a one-time operation and won't ask for the password again.
Import Configuration File
ClashX needs a configuration file to work. The configuration file contains proxy server information, routing rules, and other key settings. You can import configuration in two ways:
Method 1: Import via Subscription Link
- Click the ClashX icon in the menu bar
- Select "Config" → "Remote Config" → "Manage"
- Click the "Add" button
- Paste your subscription link (provided by proxy service provider)
- Click "OK", ClashX will automatically download and apply the configuration
Method 2: Import via Local File
- Prepare the configuration file (usually .yaml format)
- Click the ClashX icon in the menu bar
- Select "Config" → "Open Config Folder"
- Copy the configuration file to the opened folder
- Return to ClashX menu, select "Config" → Select your copied configuration file
Configuration files are usually provided by proxy service providers. If you don't have a configuration file or subscription link yet, you need to purchase a proxy service first. ClashX itself doesn't provide proxy service, it's just a client tool.
Select Proxy Mode
After importing configuration, you need to select the appropriate proxy mode. ClashX provides three main modes:
| Mode | Description | Suitable Scenarios |
|---|---|---|
| Global Mode | All traffic goes through proxy | Accessing all sites requiring proxy |
| Rule Mode | Intelligent routing based on rules | Daily use (Recommended) |
| Direct Mode | Don't use proxy | Temporarily disable proxy |
For most users, Rule Mode is recommended. This mode automatically identifies sites requiring proxy, ensuring both access speed and saving traffic. Domestic sites go direct, foreign sites go through proxy, with intelligent routing.
Enable System Proxy
- Click the ClashX icon in the menu bar
- Make sure "Set as System Proxy" option is checked
- Select "Outbound Mode" → "Rule Mode"
- Now ClashX is working
Permission Settings Explained
To ensure ClashX works properly, system permissions need to be configured correctly. This section explains the purpose and configuration method of each permission.
Required Permissions List
- Full Disk Access: Allow ClashX to read configuration and rule files
- Network Access Permission: Allow ClashX to make network connections
- Helper Tool Permission: Allow ClashX to modify system proxy settings
Manual Authorization Steps
If permissions weren't correctly authorized at startup, you can manually set them following these steps:
- Open "System Settings" (or "System Preferences")
- Go to "Privacy & Security"
- Find "Full Disk Access" in the left list
- Click the lock icon to unlock, enter administrator password
- Click the "+" button, add ClashX application
- Make sure the switch next to ClashX is turned on
Firewall Settings
If you have macOS firewall enabled, you need to allow ClashX connection requests:
- Open "System Settings" → "Network" → "Firewall"
- Click the "Options" button
- Find ClashX in the application list
- Set to "Allow incoming connections"
These permissions are all necessary for ClashX to work properly. ClashX is open-source software with publicly transparent code and won't abuse these permissions. All permissions are used for implementing proxy functionality and won't collect or upload your personal data.
Verify Installation Success
After completing all configuration, let's verify whether ClashX is working properly. Here are several verification methods.
Method 1: Check Menu Bar Icon
- ✅ Menu bar displays cat icon
- ✅ Icon color is normal (not gray)
- ✅ Clicking the icon shows complete menu
- ✅ "Set as System Proxy" is checked
Method 2: Visit Test Websites
The most direct verification method is to visit some websites that usually require proxy:
- Visit Google.com to see if it opens normally
- Visit YouTube.com to see if videos load
- Visit Twitter.com to see if it displays normally
You can visit ip.sb or ipinfo.io to check your current IP address. If it shows the proxy server's IP, ClashX is working properly.
Method 3: View Connection Logs
- Click the ClashX menu icon
- Select "Dashboard" or "Console"
- A web interface will open showing real-time connection information
- Visit a few websites to see if connection records are generated
- If connection records appear, the proxy is working properly
Method 4: Latency Test
- Click the ClashX menu icon
- Select "Proxy" → "Policy Group"
- Click the "Speed Test" button
- System will test latency of each node
- If latency data is displayed, nodes are available
Common Issues and Solutions
During the process of downloading, installing, or using ClashX, you may encounter some issues. This section lists the most common problems and their solutions.
Issue 1: Slow Download Speed
Downloading ClashX from GitHub is very slow or even fails.
Solutions- Use the download link provided by this site (domestic CDN acceleration)
- Use GitHub mirror acceleration service
- Download during off-peak hours (late night or early morning)
- Use download tools (such as IDM, Motrix) for multi-threaded downloading
Issue 2: "Damaged and Cannot Open" Prompt
When opening ClashX, a prompt says "ClashX is damaged and can't be opened. You should move it to the Trash."
SolutionsThis is caused by macOS's Gatekeeper security mechanism. Execute the following command:
sudo xattr -r -d com.apple.quarantine /Applications/ClashX.appSteps: 1. Open the "Terminal" app (in the "Other" folder in Launchpad) 2. Copy and paste the above command into Terminal 3. Press Enter, enter administrator password 4. Reopen ClashX
Issue 3: Cannot Install Helper Tool
At first launch, it prompts to install helper tool, but installation fails after entering password.
Solutions- Make sure you're using an administrator account
- Allow ClashX installation in "System Settings" → "Privacy & Security"
- Restart Mac and try again
- Completely uninstall ClashX, clean up residual files, then reinstall
Issue 4: Configuration Import Failed
Error prompt when importing configuration file or subscription link.
Solutions- Check if subscription link is correct, without extra spaces or characters
- Verify configuration file format is correct (YAML syntax)
- Try using the configuration validator on the tools page
- Contact proxy service provider for correct configuration
- Check ClashX log files for specific error information
Issue 5: M1/M2/M3 Chip Compatibility Issues
ClashX runs slowly or crashes frequently on Apple Silicon Mac.
Solutions- Make sure downloaded version is Apple Silicon native version (arm64)
- Don't use Intel version running through Rosetta
- Update to latest version of ClashX
- If problems persist, submit Issue on GitHub
Issue 6: Proxy Not Working
ClashX shows running normally, but accessing websites still cannot use proxy.
Solutions- Confirm "Set as System Proxy" is checked
- Check if correct outbound mode is selected (Rule/Global)
- Test node latency, select available nodes
- Restart ClashX and browser
- Check if system proxy settings were modified by other software
- Close other potentially conflicting proxy software
Issue 7: Permission Errors
Prompts for missing permissions or cannot modify system settings.
Solutions- Check permissions in "System Settings" → "Privacy & Security"
- Make sure ClashX has "Full Disk Access" permission
- Reinstall helper tool
- Run ClashX as administrator
If the above solutions cannot solve your problem, you can: • Visit the FAQ page for more common questions • Search or submit issues on GitHub Issues • Join the ClashX Chinese community for help • Check complete tutorials for more usage tips
Next Steps
Congratulations! You have successfully installed and configured ClashX. Now you can further optimize and customize ClashX for a better experience.
Recommended Follow-up Actions
- Learn rule configuration: Understand how to write and optimize Clash rules for intelligent routing → Configuration File Guide
- Optimize node selection: Learn how to speed test and select optimal nodes to improve proxy speed
- Set auto-start: Configure ClashX to start automatically at boot, no manual operation needed
- Backup configuration files: Regularly backup configuration to avoid data loss
- Explore advanced features: TUN mode, DNS optimization, rule set subscriptions, etc.
Related Tutorial Recommendations
Daily Usage Tips
| Tip | Description |
|---|---|
| Quick Mode Switching | Use menu bar to quickly switch Global/Rule/Direct modes |
| Auto-update Subscriptions | Set scheduled auto-update subscriptions to keep nodes updated |
| View Real-time Logs | Monitor connection status and traffic through Dashboard |
| Rule Testing | Regularly test node latency to select optimal nodes |
Summary
Through this tutorial, you have completed downloading, installing, and basic configuration of ClashX on Mac. As a powerful and completely free proxy tool, ClashX can meet most users' daily needs.
Content Covered in This Tutorial
- ✅ System requirements and chip compatibility check
- ✅ Three download methods (official website, GitHub, mirror sites)
- ✅ Detailed installation steps and illustrated instructions
- ✅ First launch configuration and permission settings
- ✅ Installation verification methods and testing techniques
- ✅ Common problem troubleshooting and solutions
- ✅ Follow-up optimization suggestions and usage tips
1. Choose correct version: Intel and Apple Silicon use different versions 2. Authorize necessary permissions: Helper tool and system proxy permissions are required 3. Configuration file importance: Correct configuration file is prerequisite for normal use 4. Rule mode recommended: Daily use recommended to use Rule mode for intelligent routing 5. Regular updates and maintenance: Keep software and configuration updated for best experience
Time Investment
Completing the entire installation and configuration process usually takes only 3-5 minutes. If you encounter problems, refer to the Common Issues section of this tutorial, most problems can be solved within 10 minutes.
• Complete Usage Tutorial - Learn ClashX advanced features in depth • Configuration File Guide - Learn how to write and optimize configuration • FAQ - View more Q&A • Blog Articles - Learn usage tips and best practices
Hope this tutorial helps you! If you encounter any problems during use, feel free to visit our FAQ page or submit issues on GitHub. Enjoy a smooth network experience!