Обзор учебника
ClashX — один из самых популярных прокси-инструментов на macOS с более чем 30 000 звёзд на GitHub и 500 000+ активных пользователей. Это руководство проведёт вас пошагово через загрузку, установку и конфигурацию ClashX на Mac, весь процесс займёт всего 3 минуты.
Независимо от того, используете ли вы MacBook на базе Intel или последний Mac с процессорами M1/M2/M3, это руководство применимо к вам. Мы предоставим подробные скриншоты и решения распространённых проблем, чтобы даже начинающие могли легко начать работу.
Если вы уже знакомы с основами ClashX, вы можете перейти непосредственно к разделам «Способы загрузки» или «Шаги установки». Если у вас возникнут какие-либо проблемы, проверьте раздел «Распространённые проблемы».
Почему выбрать ClashX?
- Полностью бесплатен: программное обеспечение с открытым исходным кодом без каких-либо сборов
- Мощные функции: поддерживает несколько протоколов прокси с гибким механизмом правил
- Отличная производительность: низкое использование памяти со стабильной и плавной работой
- Встроенная поддержка: идеально адаптирован для процессоров Apple Silicon
- Активное сообщество: полная документация на русском языке с оперативным решением проблем
Подготовка перед загрузкой
Перед началом загрузки ClashX убедитесь, что ваш Mac соответствует следующим системным требованиям. Это обеспечит плавное протекание последующего процесса установки и использования.
Системные требования
Совместимость процессоров
ClashX предоставляет две версии. Пожалуйста, выберите правильную версию в зависимости от типа процессора вашего Mac:
| Тип процессора | Совместимые модели | Версия загрузки |
|---|---|---|
| Процессор Intel | MacBook/iMac/Mac mini до 2020 года | ClashX (Intel) |
| Apple Silicon (M1/M2/M3) |
MacBook Air/Pro, iMac, Mac mini, Mac Studio после 2020 года | ClashX (Apple Silicon) |
Нажмите на значок Apple в левом верхнем углу → Выберите «Об этом Mac» → Проверьте поле «Процессор» или «Чип». Если отображается «Apple M1/M2/M3», это Apple Silicon; если отображается «Intel Core», это процессор Intel.
Контрольный список подготовки
- ✅ Подтвердите, что версия macOS 10.15 или выше
- ✅ Подтвердите, что у вас есть права администратора (пароль требуется для установки)
- ✅ Подготовьте файл конфигурации прокси или ссылку подписки
- ✅ Закройте другое потенциально конфликтующее программное обеспечение прокси
- ✅ Убедитесь, что сетевое соединение в норме
3 способа загрузки
ClashX предоставляет несколько каналов загрузки. Вы можете выбрать наиболее подходящий способ загрузки в зависимости от вашей ситуации. Вот подробные инструкции для трёх основных способов загрузки.
Способ 1: загрузка с официального веб-сайта (рекомендуется)
Загрузка через официальный веб-сайт ClashX — это самый безопасный и удобный способ. Официальный веб-сайт предоставляет проверенные последние версии с подробными примечаниями к выпуску.
Шаги загрузки:
- Посетите официальный веб-сайт ClashX: https://clashx.tech
- Нажмите кнопку «Загрузить» или перейдите на страницу загрузки
- Выберите версию, подходящую для вашего процессора Mac (Intel или Apple Silicon)
- Нажмите кнопку загрузки и дождитесь завершения загрузки
- Загруженный файл имеет формат .dmg, размер примерно 10-15 МБ
Загрузка с официального веб-сайта быстрая, версии обновляются своевременно, файлы безопасны и надёжны. Подходит для большинства пользователей, особенно для пользователей в России. Официальный веб-сайт также предоставляет подробные журналы изменений версий и документацию по использованию.
Способ 2: загрузка с GitHub
GitHub — это платформа размещения открытого исходного кода ClashX. Вы можете загрузить последние или исторические версии непосредственно со страницы GitHub Releases. Этот способ подходит для пользователей, которым нужны определённые версии или которые хотят проверить код.
Шаги загрузки:
- Посетите репозиторий GitHub ClashX: https://github.com/yichengchen/clashX
- Нажмите ссылку «Releases» справа
- Найдите раздел Assets в последнем выпуске
- Загрузите ClashX.dmg (Intel) или ClashX-arm64.dmg (Apple Silicon)
Скорость доступа к GitHub может быть медленной в России. Если скорость загрузки слишком медленная, вы можете: 1. Использовать сервис ускорения зеркала GitHub (например, ghproxy.com) 2. Дождаться часов пик для загрузки 3. Переключиться на способ загрузки с официального веб-сайта
Способ 3: загрузка с зеркального сайта
Некоторые зеркальные сайты предоставляют услуги загрузки ClashX, которые могут решить проблему медленной загрузки с GitHub.
Распространённые зеркальные сайты:
- Ускорение CDN: некоторые технические сообщества предоставляют ускоренные загрузки
- Сайты зеркал открытого исходного кода: такие как зеркала Tsinghua University, USTC
- Облачные хранилища: версии, загруженные пользователями (обратите внимание на безопасность)
При использовании сторонних зеркальных сайтов для загрузки обязательно проверьте целостность и безопасность файлов. Рекомендуется отдавать приоритет официальному веб-сайту или официальным каналам GitHub. Избегайте загрузки из неизвестных источников, чтобы предотвратить вирусы или вредоносное программное обеспечение.
Рекомендации по выбору версии
Подробные шаги установки (иллюстрированный учебник)
После завершения загрузки выполните следующие шаги для установки. Весь процесс установки очень прост, похож на установку других приложений macOS.
Шаг 1: откройте файл DMG
- Найдите загруженный файл ClashX.dmg в Finder (обычно в папке «Загрузки»)
- Дважды щёлкните, чтобы открыть файл DMG
- Подождите немного, система смонтирует образ диска и откроет окно установки
Имя файла для процессора Intel — ClashX.dmg, имя файла для Apple Silicon — ClashX-arm64.dmg. Убедитесь, что вы загрузили версию, подходящую для вашего типа процессора.
Шаг 2: перетащите в папку Applications
- После открытия файла DMG вы увидите значок приложения ClashX и ярлык папки Applications
- Перетащите значок ClashX в папку Applications
- Дождитесь завершения копирования (обычно занимает всего несколько секунд)
- После завершения копирования вы можете извлечь образ диска DMG
Шаг 3: первый запуск ClashX
- Откройте Launchpad или перейдите в папку Applications
- Найдите и нажмите на значок ClashX
- Если вы видите подсказку «не удаётся открыть», обратитесь к разделу «Распространённые проблемы» ниже
При первом открытии macOS может показать подсказку «не удаётся открыть, так как не удаётся проверить разработчика». Это стандартное поведение для всех неподписанных приложений macOS — ClashX абсолютно безопасен. Следуйте этим шагам:
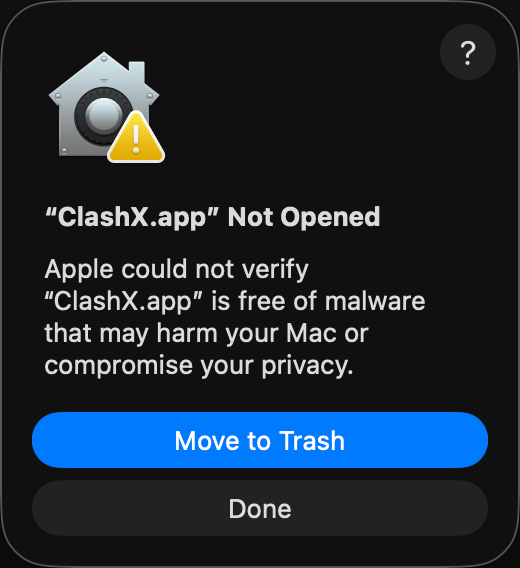
① Двойной клик — появляется предупреждение
Этот диалог появляется для всех неподписанных приложений.
👉 Нажмите «Готово»
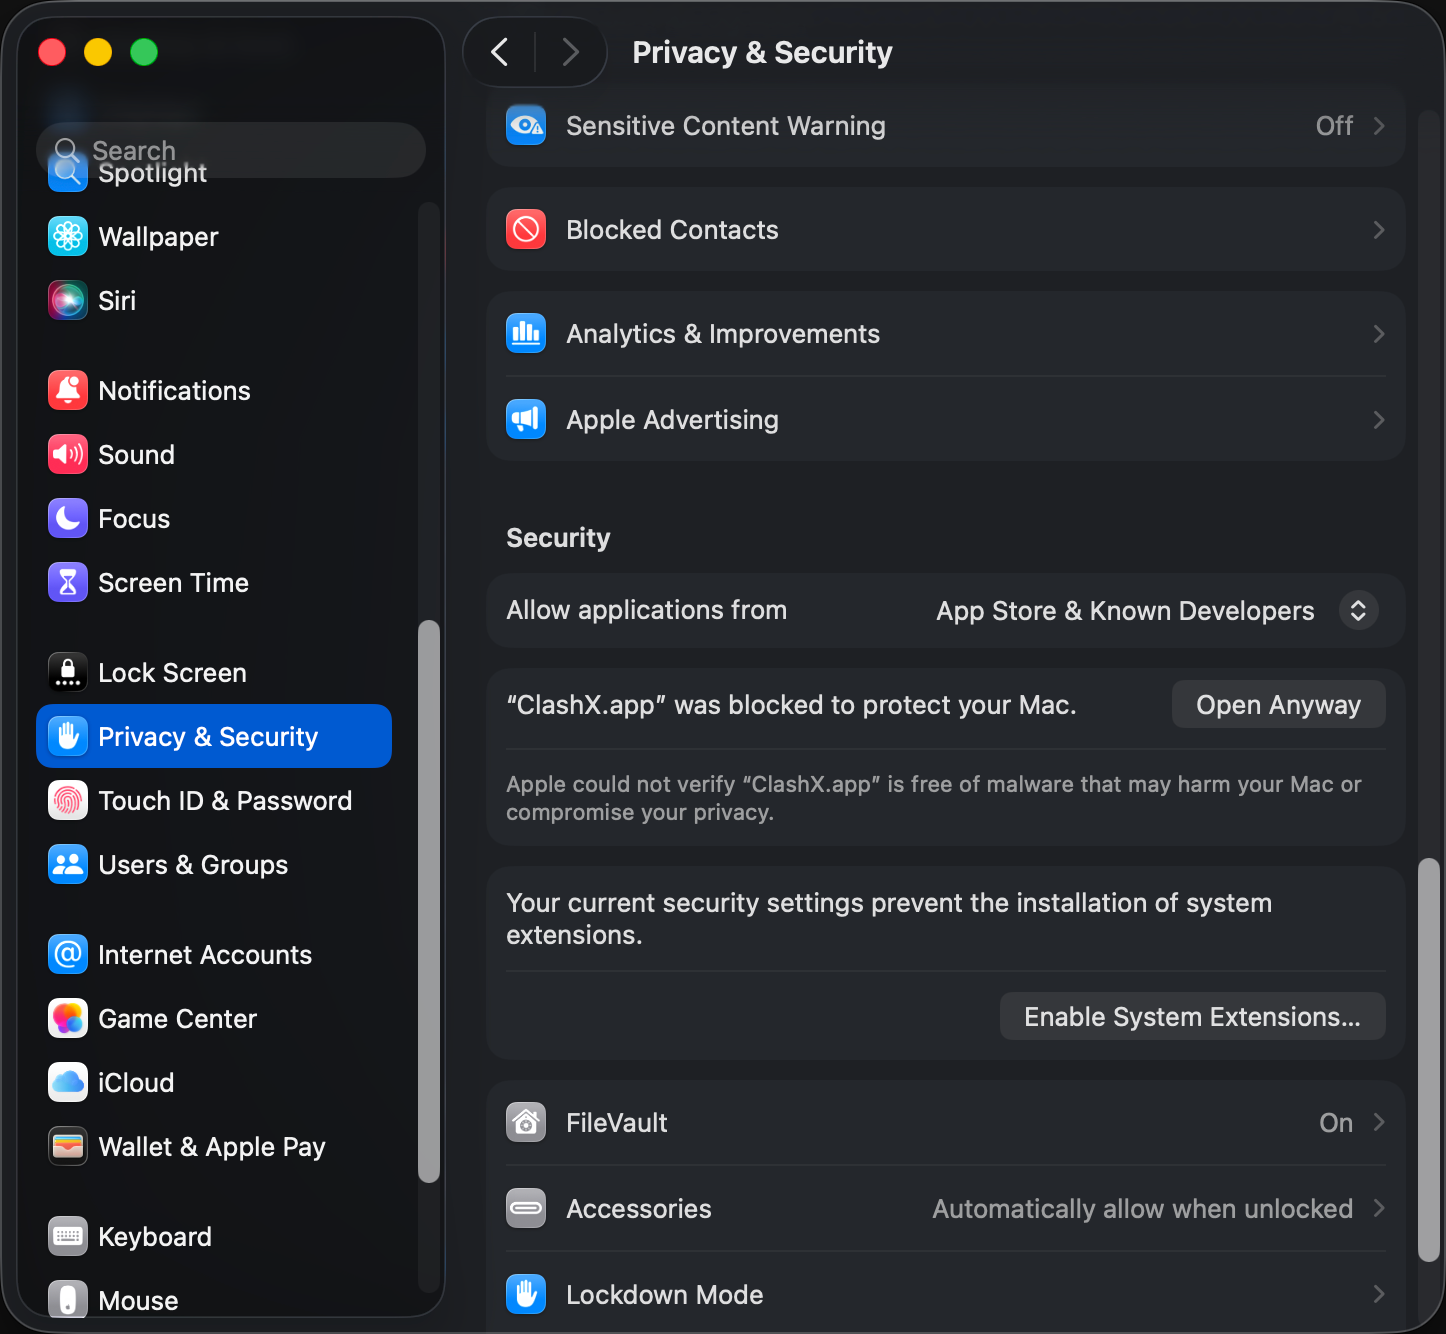
② Параметры системы → Конфиденциальность и безопасность
Откройте Параметры системы → Конфиденциальность и безопасность, прокрутите вниз и найдите «ClashX заблокирован».
👉 Нажмите «Открыть в любом случае»
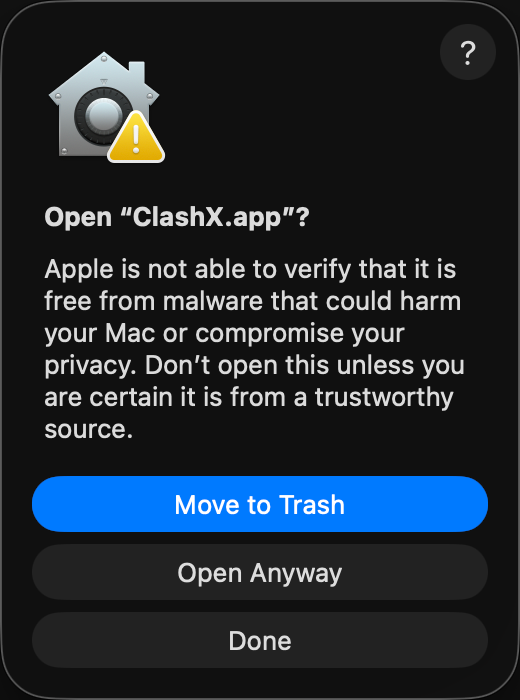
③ Подтвердите открытие
Последнее подтверждение macOS. После этого ClashX будет открываться без предупреждений.
👉 Нажмите «Открыть в любом случае»
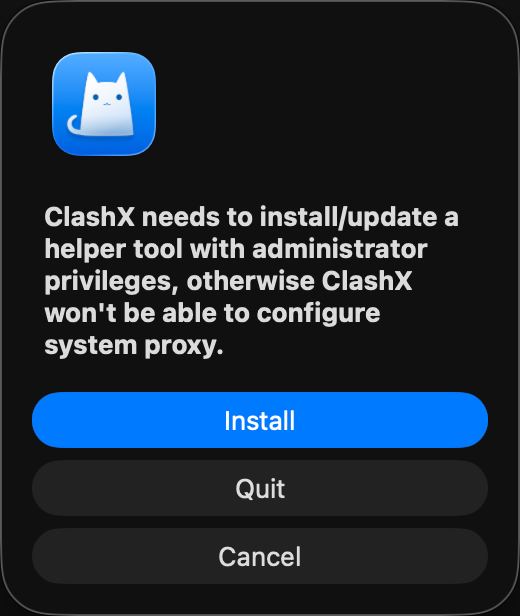
④ Установите вспомогательный инструмент
ClashX нужен вспомогательный инструмент для настройки системного прокси. Без него прокси работать не будет.
👉 Нажмите «Установить» и введите пароль Mac
Шаг 4: проверка установки
Если ClashX успешно запустится, вы увидите значок кошки в строке меню (верхний правый угол экрана). Это указывает на то, что ClashX успешно установлен и работает.
- ✅ Строка меню отображает значок кошки
- ✅ Нажатие на значок показывает параметры меню
- ✅ ClashX находится в папке Applications
Конфигурация при первом запуске
После завершения установки ClashX всё ещё требуется некоторая базовая конфигурация для нормального использования. Этот раздел проведёт вас через процесс конфигурации при первом запуске.
Разрешить системные разрешения
При первом запуске ClashX система запросит несколько разрешений. Эти разрешения необходимы для правильной работы ClashX.
Требуемые разрешения:
- Установить вспомогательный инструмент: при первом запуске появится поле ввода пароля, введите пароль администратора вашего Mac
- Разрешение на доступ в сеть: разрешить ClashX управлять сетевыми соединениями
- Параметры системного прокси: разрешить ClashX изменять конфигурацию системного прокси
ClashX должен установить вспомогательный инструмент для управления параметрами системного прокси. Этому вспомогательному инструменту требуются повышенные привилегии для изменения конфигурации сети на уровне системы, поэтому требуется пароль администратора. Это одноразовая операция, и пароль больше не будет запрашиваться.
Импортировать файл конфигурации
ClashX требуется файл конфигурации для работы. Файл конфигурации содержит информацию о прокси-сервере, правила маршрутизации и другие ключевые параметры. Вы можете импортировать конфигурацию двумя способами:
Способ 1: импорт через ссылку подписки
- Нажмите на значок ClashX в строке меню
- Выберите «Config» → «Remote Config» → «Manage»
- Нажмите кнопку «Add»
- Вставьте ссылку подписки (предоставляется поставщиком услуг прокси)
- Нажмите «OK», ClashX автоматически загрузит и применит конфигурацию
Способ 2: импорт через локальный файл
- Подготовьте файл конфигурации (обычно формат .yaml)
- Нажмите на значок ClashX в строке меню
- Выберите «Config» → «Open Config Folder»
- Скопируйте файл конфигурации в открытую папку
- Вернитесь в меню ClashX, выберите «Config» → Выберите скопированный файл конфигурации
Файлы конфигурации обычно предоставляются поставщиками услуг прокси. Если у вас ещё нет файла конфигурации или ссылки подписки, вам необходимо сначала приобрести услугу прокси. ClashX сам по себе не предоставляет услугу прокси, это просто клиентский инструмент.
Параметры разрешений (подробно)
Чтобы ClashX работал корректно, необходимо правильно настроить системные разрешения. В этом разделе подробно описаны необходимые разрешения и пошаговая настройка.
Список необходимых разрешений
- Полный доступ к диску: позволяет ClashX читать файлы конфигурации и правила
- Доступ к сети: разрешает ClashX устанавливать сетевые соединения
- Разрешение на вспомогательный инструмент: позволяет ClashX изменять параметры системного прокси
Шаги ручной авторизации
Если при первом запуске разрешения не были выданы, настройте их вручную по инструкции ниже:
- Откройте «Настройки системы» (или «Системные настройки»)
- Перейдите в раздел «Конфиденциальность и безопасность»
- В левом меню выберите «Полный доступ к диску»
- Нажмите на значок замка и введите пароль администратора
- Нажмите «+» и добавьте приложение ClashX
- Убедитесь, что переключатель рядом с ClashX включён
Настройка брандмауэра
Если включён брандмауэр macOS, разрешите соединения для ClashX:
- Откройте «Настройки системы» → «Сеть» → «Брандмауэр»
- Нажмите кнопку «Параметры»
- Найдите ClashX в списке приложений
- Выберите «Разрешить входящие соединения»
Эти разрешения необходимы для корректной работы функций ClashX. ClashX — проект с открытым исходным кодом, не злоупотребляет разрешениями и не собирает ваши личные данные. Все разрешения используются исключительно для реализации прокси‑функций.
Проверка успешной установки
После завершения настроек убедитесь, что ClashX работает корректно. Используйте один или несколько методов ниже.
Метод 1: проверка значка в строке меню
- ✅ В строке меню виден значок кошки
- ✅ Значок цветной (не серый)
- ✅ По клику отображается полное меню
- ✅ Пункт «Установить как системный прокси» включён
Метод 2: тестовые сайты
Самый простой способ — открыть сайты, которые обычно требуют прокси:
- Перейдите на Google.com — сайт должен открываться
- Откройте YouTube.com — видео должны загружаться
- Откройте Twitter.com — лента должна отображаться
Посетите ip.sb или ipinfo.io и проверьте текущий IP. Если отображается IP вашего прокси‑сервера, значит ClashX работает корректно.
Метод 3: журнал соединений
- Нажмите значок ClashX в строке меню
- Выберите «Dashboard» или «Консоль»
- Откроется веб‑интерфейс с живыми соединениями
- Откройте несколько сайтов и проверьте появление записей
- Если записи есть — прокси работает
Метод 4: тест задержки
- Нажмите значок ClashX
- Выберите «Proxy» → «Policy Group»
- Нажмите кнопку «Тест скорости/задержки»
- Система измерит задержку для всех узлов
- Если отображаются значения — узлы доступны
Распространённые проблемы и решения
При загрузке, установке или использовании ClashX могут возникать ошибки. Ниже приведены наиболее частые проблемы и способы их решения.
Проблема 1: очень медленная загрузка
Скорость загрузки ClashX с GitHub очень низкая или загрузка обрывается.
Решение- Используйте ссылку загрузки с нашего сайта (CDN‑ускорение)
- Воспользуйтесь сервисом ускорения GitHub‑загрузок
- Пробуйте загружать в непиковое время (ночью/рано утром)
- Используйте менеджер загрузок (IDM, Motrix) с несколькими потоками
Проблема 2: «Повреждён, не удаётся открыть»
При открытии появляется сообщение: «ClashX повреждён и не может быть открыт. Переместите его в корзину».
РешениеЭто механизм безопасности Gatekeeper в macOS. Выполните команду:
sudo xattr -r -d com.apple.quarantine /Applications/ClashX.appШаги: 1) Откройте приложение «Терминал» (Launchpad → Папка «Другие») 2) Скопируйте и вставьте команду выше 3) Нажмите Enter и введите пароль администратора 4) Откройте ClashX заново
Проблема 3: не удаётся установить вспомогательный инструмент
При первом запуске запрашивается установка вспомогательного инструмента, но она завершается неудачно.
Решение- Убедитесь, что используете учётную запись администратора
- Разрешите установку в «Настройки системы» → «Конфиденциальность и безопасность»
- Перезагрузите Mac и попробуйте снова
- Полностью удалите ClashX, очистите остаточные файлы и переустановите
Проблема 4: ошибка импорта конфигурации
При импорте файла конфигурации или ссылки подписки появляется ошибка.
Решение- Проверьте корректность ссылки подписки (без пробелов и лишних символов)
- Убедитесь, что формат файла верный (синтаксис YAML)
- Проверьте файл валидатором на странице инструментов
- Обратитесь к провайдеру за правильной конфигурацией
- Просмотрите журнал ClashX, чтобы понять причину ошибки
Проблема 5: совместимость чипов M1/M2/M3
На Apple Silicon Mac ClashX работает медленно или вылетает.
Решение- Скачайте нативную версию для Apple Silicon (arm64)
- Не используйте Intel‑версию через Rosetta
- Обновитесь до последней версии ClashX
- Если проблема сохраняется — создайте Issue на GitHub
Проблема 6: прокси не работает
ClashX запущен, но сайты всё равно открываются без прокси или не открываются вовсе.
Решение- Проверьте, включён ли пункт «Установить как системный прокси»
- Убедитесь, что выбран правильный режим (Правила/Глобальный)
- Проведите тест задержки и выберите рабочий узел
- Перезапустите ClashX и браузер
- Проверьте, не изменено ли системное прокси другим ПО
- Закройте другие прокси‑клиенты, которые могут конфликтовать
Проблема 7: ошибки разрешений
Сообщения о недостаточных разрешениях или невозможности изменить системные параметры.
Решение- Проверьте разрешения в «Настройки системы» → «Конфиденциальность и безопасность»
- Убедитесь, что ClashX имеет «Полный доступ к диску»
- Переустановите вспомогательный инструмент
- Запустите ClashX с правами администратора
Если решения выше не помогли: • откройте раздел FAQ • поищите/создайте Issue на GitHub • присоединйтесь к сообществу ClashX • посмотрите полное руководство по использованию.
Следующие шаги
Поздравляем! Вы установили и настроили ClashX. Дальше — оптимизация и тонкая настройка для лучшего опыта.
Рекомендуемые действия
- Изучите конфигурацию правил: как писать и оптимизировать правила Clash для умного разделения трафика
- Оптимизируйте выбор узлов: тест задержки и выбор оптимального узла для ускорения
- Включите автозапуск: настройте автоматический старт ClashX при входе в систему
- Делайте бэкапы: регулярно сохраняйте конфигурацию, чтобы не потерять настройки
- Освойте продвинутые функции: режим TUN, оптимизацию DNS, подписки на наборы правил
Рекомендуемые учебники
Ежедневные советы по использованию
| Совет | Описание |
|---|---|
| Быстрое переключение режимов | Используйте меню в строке меню для переключения Глобальный/Правила/Прямой |
| Автообновление подписки | Настройте регулярное обновление подписки, чтобы узлы всегда были актуальны |
| Просмотр журнала | Следите за соединениями и трафиком через Dashboard |
| Тестирование узлов | Периодически проверяйте задержку и выбирайте лучший узел |
Резюме
С помощью этого руководства вы скачали, установили и базово настроили ClashX на Mac. ClashX — мощный и полностью бесплатный клиент прокси, который покрывает большинство повседневных задач.
Что охватывает это руководство
- ✅ Системные требования и проверка совместимости чипа
- ✅ Три способа загрузки (официальный сайт, GitHub, зеркала)
- ✅ Подробные шаги установки с пояснениями
- ✅ Первичная настройка и параметры разрешений
- ✅ Методы проверки установки и тесты
- ✅ Частые проблемы и способы их решения
- ✅ Рекомендации по дальнейшим действиям и лайфхаки
1) Выберите правильную версию: Intel и Apple Silicon используют разные сборки. 2) Разрешения обязательны: вспомогательный инструмент и системный прокси. 3) Конфигурация важна: корректный файл необходим для работы. 4) Рекомендуем режим «Правила» для ежедневного использования. 5) Регулярно обновляйте приложение и конфигурацию.
Затраты времени
Весь процесс установки и настройки обычно занимает 3–5 минут. Если возникнут сложности — обратитесь к разделу с частыми проблемами: большинство вопросов решаются за 10 минут.
• Полное руководство по использованию — изучайте продвинутые функции • Гайд по конфигурации — как писать и оптимизировать конфиг • Частые вопросы — ещё больше ответов • Блог — приёмы и лучшие практики
Надеемся, это руководство было полезным. Если столкнётесь с проблемами — загляните в раздел FAQ или создайте Issue на GitHub. Приятного и стабильного интернета!