Руководство Clash X
От новичка до эксперта, легко овладейте конфигурацией прокси

Спонсировано
1. Основные концепции
Перед началом понимание того, как работает ClashX, поможет вам лучше его настроить.
Как это работает
ClashX — это клиент прокси на основе правил. В отличие от традиционных VPN (глобальные зашифрованные туннели), ClashX работает на уровне приложения (системный прокси) или сетевом уровне (режим TUN), используя предустановленные списки правил для определения того, куда должен идти каждый сетевой запрос.
Файл конфигурации (YAML)
Ядро ClashX — это файл config.yaml. Этот файл определяет три основные части:
- Прокси: Определяет информацию прокси-сервера (IP, порт, метод шифрования).
- Группы прокси: Группирует узлы вместе, например, "Автоматический выбор", "Ручной выбор", "Сервисы Apple" и т. д.
- Правила: Определяет логику сопоставления трафика, например,
DOMAIN-SUFFIX,google.com,Proxy.
1. Руководство по установке
Три простых шага для быстрой установки Clash X
Скачайте приложение
Посетите страницу загрузки, выберите версию для вашей системы и загрузите.
Установите приложение
- Дважды щелкните загруженный файл .dmg
- Перетащите значок Clash X в папку "Applications"
- Найдите Clash X в папке "Applications" и дважды щелкните для открытия
Предоставьте разрешения (пошаговое руководство)
ClashX не имеет подписи Apple, поэтому macOS покажет предупреждение безопасности при первом запуске. Это стандартное поведение для всех неподписанных приложений macOS — ClashX абсолютно безопасен. Следуйте этим шагам:
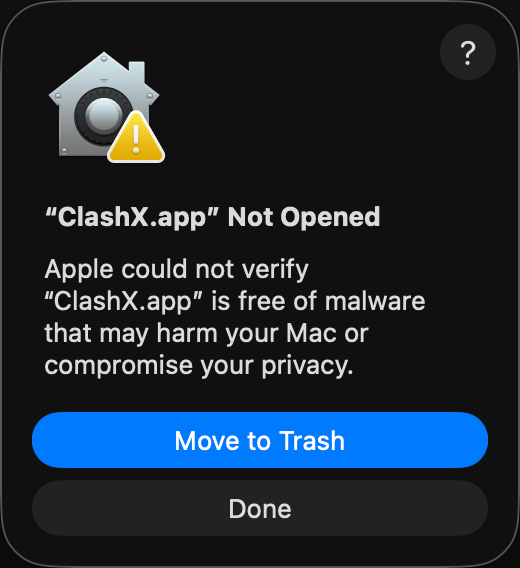
① Двойной клик — появляется предупреждение
Этот диалог появляется для всех неподписанных приложений — это нормальная реакция macOS.
👉 Нажмите «Готово» (НЕ нажимайте «Переместить в корзину»)
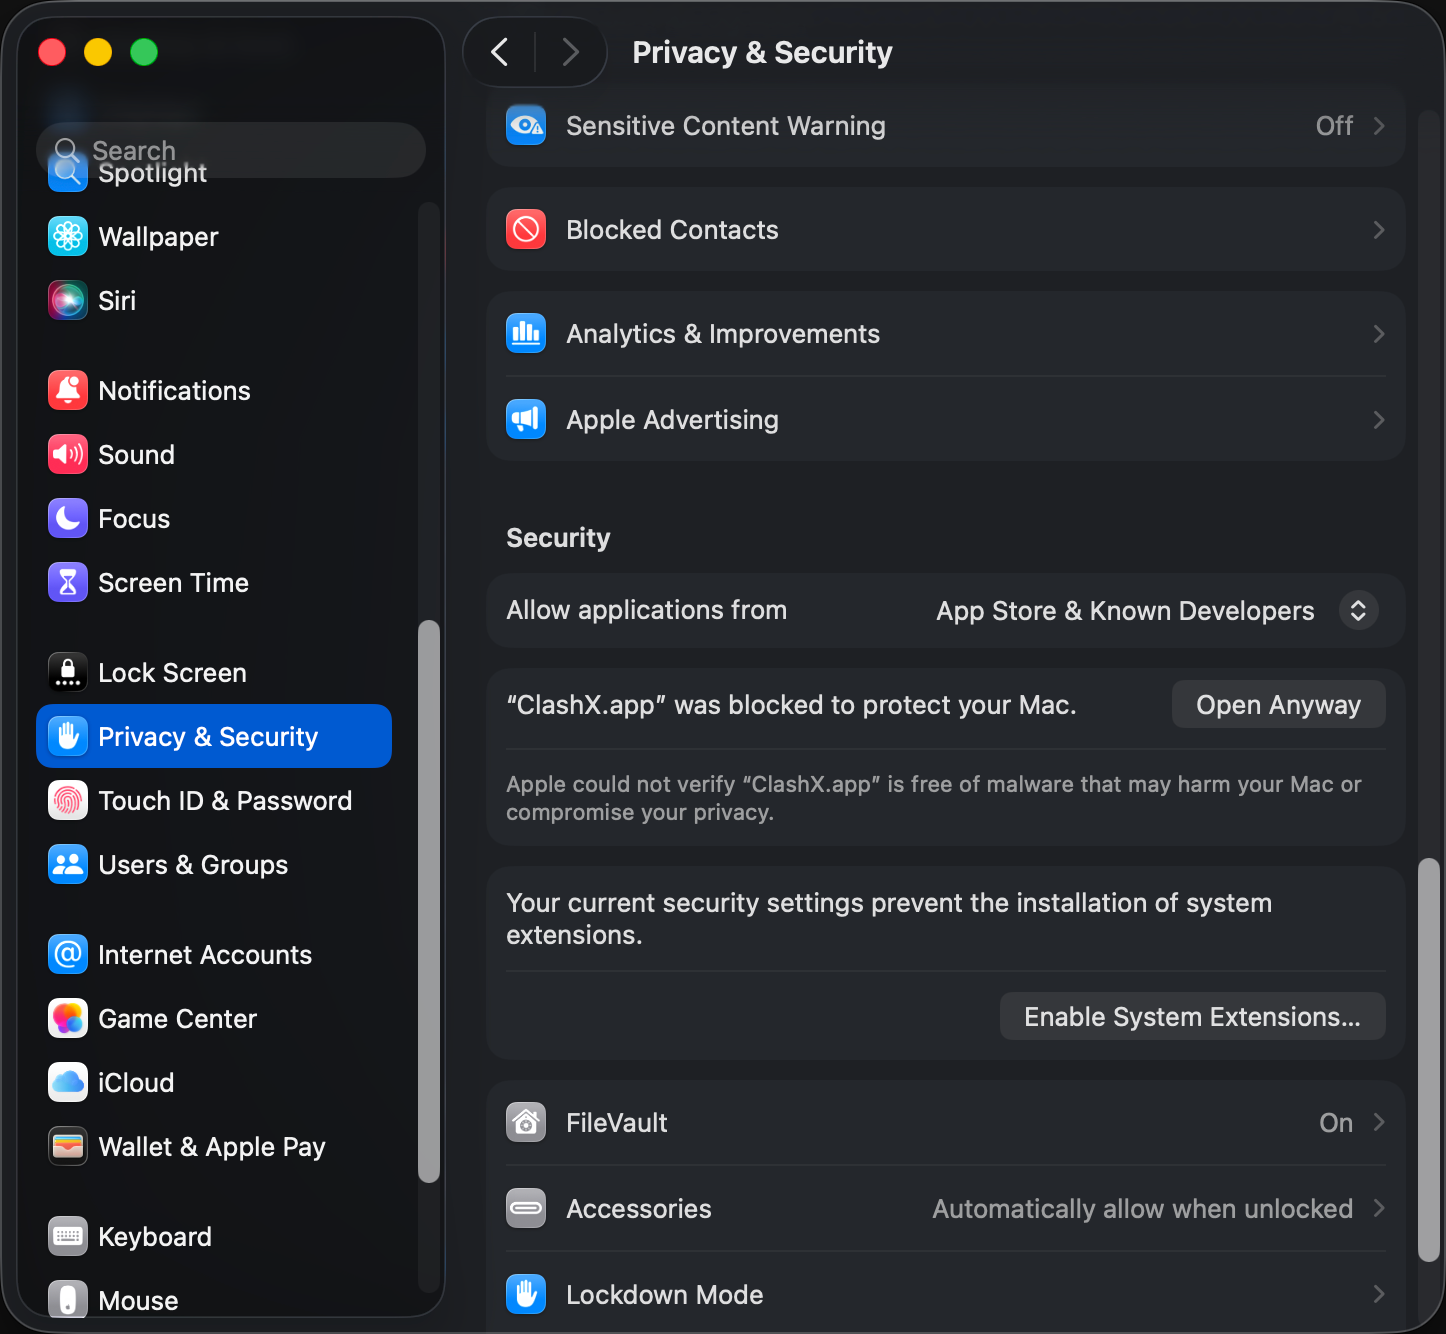
② Параметры системы → Конфиденциальность и безопасность
Откройте Параметры системы → Конфиденциальность и безопасность, прокрутите вниз и найдите «ClashX заблокирован для защиты Mac».
👉 Нажмите «Открыть в любом случае»
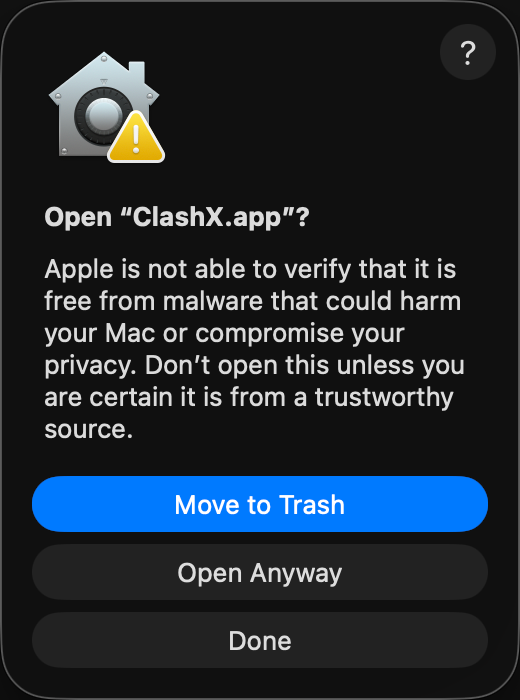
③ Подтвердите открытие
Последнее подтверждение macOS. После этого ClashX будет открываться без предупреждений.
👉 Нажмите «Открыть в любом случае»
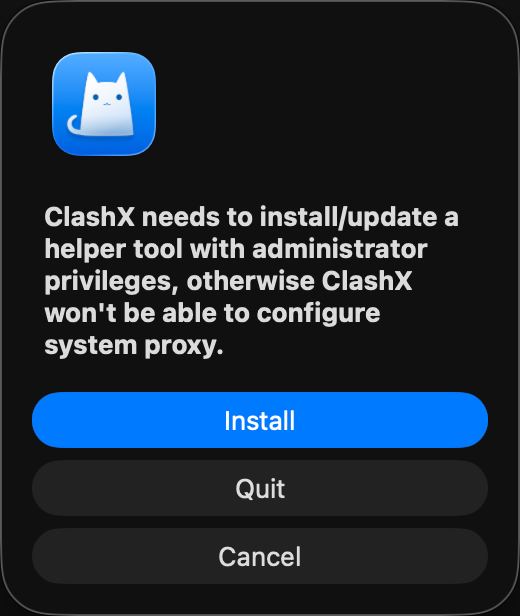
④ Установите вспомогательный инструмент
ClashX нужен вспомогательный инструмент для настройки системного прокси. Без него прокси работать не будет.
👉 Нажмите «Установить» и введите пароль Mac
💡 Альтернатива: одна команда в Терминале
Если вы знакомы с Терминалом, выполните эту команду, чтобы пропустить шаги выше:
sudo xattr -rd com.apple.quarantine /Applications/ClashX.app2. Базовая конфигурация
Завершите начальную настройку и будьте готовы к использованию
Запустите Clash X
После открытия приложения вы увидите значок Clash X (значок кошки) в строке меню. Нажмите на значок, чтобы увидеть главное меню.
Начальная настройка
- Нажмите на значок в строке меню
- Выберите "Config" → "Open Config Folder"
- Поместите ваш файл конфигурации (.yaml) в эту папку
- Вернитесь в меню и выберите ваш файл конфигурации в разделе "Config"
3. Параметры подписки
Используйте ссылки подписки для автоматического обновления конфигураций узлов
Добавьте ссылку подписки
Ссылки подписки — это наиболее удобный способ конфигурации и могут автоматически обновлять информацию об узлах.
Обновите подписку
Ссылки подписки можно обновлять регулярно, чтобы получить последнюю информацию об узлах:
Ручное обновление
Меню Config → Выберите конфигурацию → Нажмите "Update"
Автоматическое обновление
Установите интервал обновления в управляемой конфигурации
4. Режимы прокси
Поймите три режима прокси и выберите подходящий для вашего случая
Глобальный режим
Весь трафик проходит через прокси, подходит для сценариев, требующих полного прокси.
Режим правил
Автоматически определяет, использовать ли прокси на основе правил, интеллектуальная маршрутизация трафика, рекомендуется.
Прямой режим
Весь трафик идет напрямую без прокси. Используется для временного отключения прокси.
Переключение режима прокси
Нажмите на значок Clash X в строке меню и выберите нужный режим в разделе "Outbound Mode".
5. Конфигурация правил
Настройте правила трафика для точного управления поведением прокси
Объяснение правил
Правила используются для определения того, какой трафик должен проходить через прокси, а какой должен идти напрямую. Распространенные типы правил:
DOMAIN-SUFFIX
Сопоставление суффикса домена
DOMAIN-KEYWORD
Сопоставление ключевого слова домена
IP-CIDR
Сопоставление диапазона IP-адресов
GEOIP
Сопоставление географического местоположения
Пользовательские правила
Отредактируйте файл конфигурации и добавьте пользовательские правила в раздел правил:
rules:
  - DOMAIN-SUFFIX,google.com,Proxy
  - DOMAIN-KEYWORD,youtube,Proxy
  - GEOIP,CN,DIRECT
- MATCH,Proxy6. Продвинутые функции
Овладейте этими продвинутыми функциями для лучшего опыта
Панель управления
ClashX предоставляет веб-панель управления для мониторинга трафика и статуса соединения в реальном времени:
- Строка меню → Нажмите "Dashboard"
- Браузер автоматически откроет панель управления
- Просмотрите трафик в реальном времени, количество соединений, сопоставление правил и другую информацию
Тест скорости
Протестируйте задержку узла и выберите самый быстрый узел:
- Строка меню → Proxy → Выберите группу политик
- Нажмите кнопку "Speed Test"
- Дождитесь завершения, узел с наименьшей задержкой будет выбран
Расширенный режим
Включение расширенного режима может проксировать больше типов трафика:
- Строка меню → "Set as System Proxy" (отметить)
- Строка меню → "Enhanced Mode" (отметить)
8. Безопасность и конфиденциальность
Узнайте, как безопасно использовать ClashX для защиты конфиденциальности вашей сети.
Локальное шифрование
Как локальный клиент прокси, ClashX выполняет все сопоставления правил и решения маршрутизации локально на вашем Mac. Ваши необработанные данные трафика не загружаются на какие-либо сторонние серверы (кроме прокси-серверов, которые вы настраиваете).
Защита от утечек DNS
Чтобы предотвратить загрязнение DNS и утечки конфиденциальности, рекомендуется включить шифрование DNS (DoH или DoT) в файле конфигурации. ClashX поддерживает перехват системных запросов DNS, чтобы убедиться, что процесс разрешения доменов также зашифрован.
7. Часто задаваемые вопросы
Быстро найдите решения распространенных проблем
Почему я не могу подключиться?
+Пожалуйста, проверьте следующее:
- Правильный ли формат файла конфигурации?
- Действительна ли ссылка подписки?
- Доступен ли узел (попробуйте переключиться на другие узлы)?
- Правильна ли настройка системного прокси?
- Блокирует ли брандмауэр Clash X?
Как исправить проблемы с медленной скоростью?
+Вы можете попробовать следующее:
- Используйте тест скорости для выбора узлов с низкой задержкой
- Переключитесь на другие узлы
- Проверьте статус локальной сети
- Свяжитесь с поставщиком услуг
Значок не отображается после запуска?
+Значок в строке меню может быть скрыт:
- Удерживайте клавишу ⌘ (Command) и перетащите значок для регулировки положения
- Проверьте параметры строки меню в параметрах системы
- Перезагрузите приложение
Как удалить Clash X?
+Полные шаги удаления:
- Выйдите из Clash X (Меню → Выход)
- Удалите /Applications/ClashX.app
- Удалите файлы конфигурации: ~/.config/clash
- Проверьте параметры системного прокси, чтобы убедиться, что они восстановлены по умолчанию
Быстрая настройка прокси терминала для разработчиков
Исправьте распространенную проблему, когда браузер работает, но инструменты терминала истекают по времени
- Сначала включите режим TUN для унификации маршрутизации трафика терминала и GUI.
- Если вы еще не используете TUN, явно установите
http_proxyиhttps_proxyв вашей оболочке. - Для перемежающихся сбоев устраняйте неполадки с помощью руководства по истечению времени соединения и контрольного списка DNS вместе.
Дополнительное чтение
Изучите больше функций и советов ClashX
Настройка режима TUN
Исправьте проблемы с разрешениями и включите расширенный режим
Руководство по конфигурации YAML
Поймите структуру файла конфигурации
Настройка ссылки подписки
Импортируйте конфигурации узлов в один клик
Устранение неполадок соединения
Разрешите распространенные причины, по которым ClashX не может подключиться
TUN: расширенная диагностика
Подробное руководство на сайте ClashX Pro
Рекомендуемые инструменты
Дополните ClashX инструментами для разных сценариев
GearUP Game Booster
Скидка 10% — Код: CLASHXСнижение задержки с AIR маршрутизацией. Valorant, Apex, CS2, Fortnite и 1000+ игр.
Узнать больше →Партнёрская ссылка · Раскрытие
Saily Travel eSIM
eSIM от Nord Security. 150+ стран — Турция, ОАЭ, Таиланд. Без замены SIM, без роуминга.
Узнать больше →Партнёрская ссылка · Раскрытие